The ARES membership information is held within a secure website and online database system. The system has been built with security and member ease of use as the top priorities. Additionally, this manual has been written to help guide members when performing various functions within the system.
As DECs, SEC or SM, you have been given additional functions for the ARES database over the normal ARES member. This functionality is given via a totally seperate interface and login. As a result, you should have your own separate member record to keep yourself registered in the system as a member, as well as a separate admin record that uses your login to the admin interface described here.
Be aware that there is also a "Subadmin" interface with it's own menu, used by the ECs and local RACES Officers. This menu provides a subset of functions given here, all of which are effective only on the members assigned directly to them. For example, a subadmin that executes a search on a call sign will only get a result if there is someone in the database with that call AND that person is assigned to the subadmin performing the search. In contrast with the admins, you may search for the call and as long as there is someone in the database with that call it will return the result, regardless of whom they are assigned to. Although you will not be able to access the subadmin menu, you may view the help system for it here. Again, the functions available to subadmins are subsets of those offered to admins.
The most significant routine activity that a DEC should undertake, is acknowledging and processing new member signups. The system generates an automatic acknowledgement email, but an email to the new member after your record review would be a good followup to introduce yourself and any EC they would work with. New signups are listed on the main menu under List Pending Member records. New signups are placed into pending status. See further information below on processing new signups.
Additionally, there is a "super-admin" menu available only to a couple of chosen individuals in the section. The super-admin menu is similar to the admin menu, except all items that are listed here as being read only and editable to the super admins. The super-admin menu is designed to be used to set up the section's ARES organizational infrastructure. Items like adding, deleting and editing the subadmins and admins, deleting member accounts and other such things are within the preview of the super-admins. If you run into problems or find some data that needs updating that you cannot edit, please contact one of these individuals for assistance.
We take security and data privacy very seriously. Any use of the administration functions described herein that is forbidden by our data privacy policy, either explicitly or in nature, is considered abuse of the system, resulting in restrictions being put into place. All actions within this interface are logged for security purposes.
If you have any problems that this manual does not cover or any other questions about the system, please feel free to contact Phil McNamara N1XTB.
DEC's and selected others get an email notification when someone has entered their application into the system. New applications are placed in pending status. ARES members in pending status can be listed from the main admin menu choice List Pending Member records.
Click on that member and review their experience. Based on that review, their status can be updated via the pulldown menu or checkboxes at the top of the profile screen.

A followup email to the new member would be good practice to welcome them to ARES.
Admins and subadmins are able to enter new members into the system. This is done by clicking on the Enter New ARES Application link off of the main menu. The screen is very much like entering a new application in the normal member interface, except as an admin you can also do the following:
Entering a new member record into the system should be done ONLY when a member does not have a PC or Internet access. The strong preference is for members to enter and edit their own data, allieviating the clerical duties for the ARES leadership as much as possible. In the case that the member does not have a PC or Internet access, have the member fill out a paper form FSD-98. You can use that information to enter their membership into the system.
To view or edit a member record (including assigning the member to an EC), the record must first be located. This can be done by either
clicking on the main menu link List Member Records and scrolling down to the record in question, or by running a
search for the record. The member record can also be opened from the List Pending Member records admin menu choice.
Once located, click on the link labeled Edit_Link.

Once in the edit screen you may edit all of the normal member record fields, including their training and equipment asset records. You can also do the following:
Once you have completed your edits to the member record, scoll to the top of bottom of the page and click on the Update Member Information button to save the changes.
Another available option is to assign members to a "role" rather than to a specific EC callsign. This allows an Emergency Coordinator to be assigned to a group of members, and later avoids having to then individually edit each member records to replace contents of the Assigned EC field when an EC is reassigned.
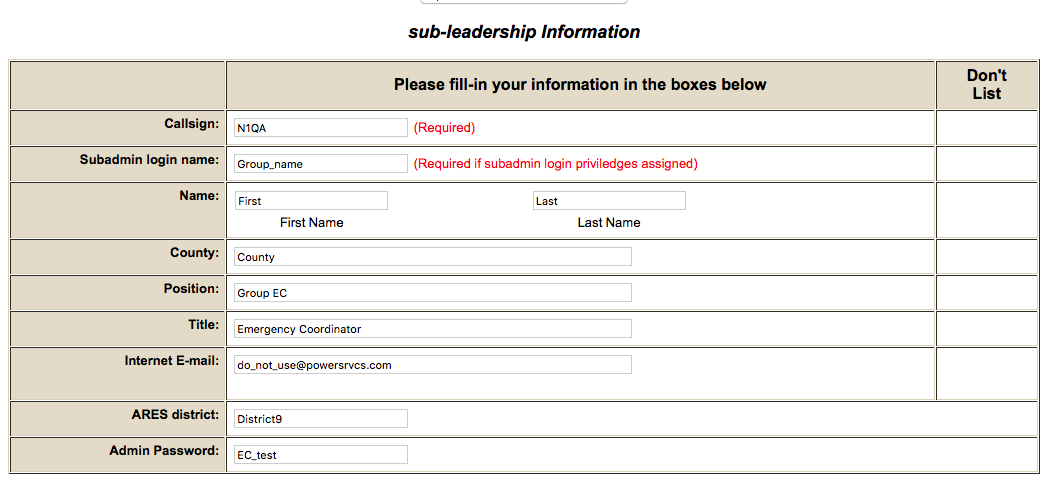
How is this done? The key to this is the EC record. The key field is the Subadmin login name near the top of the EC record create or edit screen. The EC record is created and maintained by the super admin user. Once it is created, any DEC can make the "role" assignment.
In this example, the EC record has the role asigned of "Group_name". The subadmin login name is the role. The example has the role and ARES district with different values, but that is not required. Just be aware that the login name is not displayed in any leadership list.

Simply use the role in the Assigned Emergency Coordinator data block on the members profile page.

The EC will login using the role as the login name.
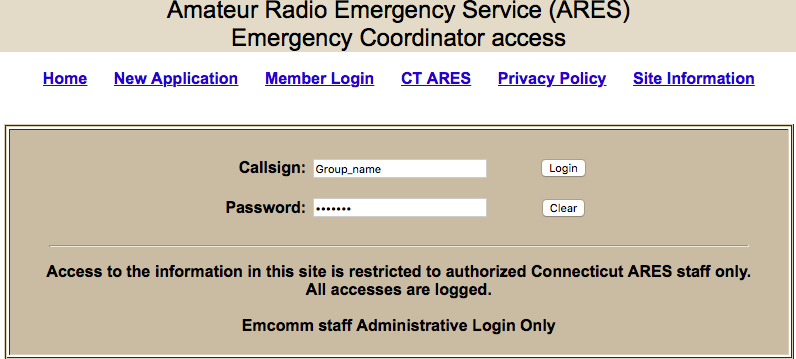
When the EC logs in and views his list of assigned members, anyone assigned to his login name "role" will appear.

When the EC position is re-assigned at a later date, the super admin updates the callsign and contact information and the password in the EC profile record. The revised login informtion is provided to the new EC. No member records need to be updated.
If a member if no longer active, or a silent key, or you wish to remove them from any roster or active report, click the Inactive/SK/Archive? checkbox. The record is preserved, and is shown in a separate listing on the admin menu. The member is removed from active reports, statistics and listings.

Viewing and exporting member contact rosters or training reports are available by ARES district. To start, perform the following:
You will be presented with a page containing three links at the top, followed by district contact roster and training reports. The reports shown are the best way to view the information online. The links at the top are for exporting the district contact roster and training reports to a tab-delimited text file. The text file can then be imported into a spreadsheet program (such as Microsoft Excel or OpenOffice Calc).
Certain member email addresses will no longer work because of various reasons. Typically bounce messages are returned from previous mails. In order to identify these email address more easily, it is recommended to edit the email field in the member profile to something like ??@?? prior to this mailing step. This lets you id and omit them them during the mail process.
There is mailer default logic that uses the email address in globals. The ARES mail delivery may fail to certain providers because the mailer would send the email using the logged in admin users email address. The default logic uses an email address valid on the server used for outgoing email. If an email address is not created in globals, the admin users email address is used. Note that if you wish to use your own address, the domain you use for sending email must have an SPF or DKIM record created to authorize the ARES project server to send email on your behalf. This is required because of the spam blocking policies of major email providers.
Email bounces will go to section_name#@oak.w1mv.org (the address on the globals page). Administrators can use those bounces to prune accounts for stale data. A recommended practice is to edit bounce email addresses to ??@?? in the user profile while you hunt down a working email (phone/snail mail). If you strike out, then mark the account as inactive. The email address in globals is set up as IMAP so several ARES leadership folks can share/use it to "pool" responses for standby and activation responses.
The system can be used to send an email out to an entire ARES district, or a subset of members within a district. To do so, perform the following:
There are three types of training reports available on the section level. All are available as links off of the main menu.
Viewing equipment assets available within the membership is simple, using the List All Asset Records link off of the main menu. The main report will show how many of each of the standard pieces of equipment are available within the membership. To determine the details about which members own said piece of equipment and a short description of each, click on the List link at the end of that line.
Non-standard equipment assets may also be viewed. At the bottom of the page, click on the List link on the line with the text Additional Asset Records.
A tab delimited text file of all of the members within the section, including phone number and email addresses, is available on the Create and export member list text file link off of the main menu. The text file can then be imported into a spreadsheet program (such as Microsoft Excel or OpenOffice Calc).
The section's ARES leadership can be viewed off of the List Leadership Positions link on the main menu. The list seperated showing Admins first, then Subadmins.
Since the attacks of September 11th, security has become a paramount issue to the agencies we serve. More questions are being asked prior to participation in federal exercises as well as some activation's where the federal government is involved, resulting in their requiring our members date of birth data. As this information may be requested with little or no advanced warning, all participating amateurs are encouraged to put this information into the database. The information will only be utilized when it is required by a served agency for ID card preparation. Without this information on file, a member may not be able to be made available for operations such as Operation Atlas or TOPOFF-III where the DHS requires this information in order to participate.
By clicking on the Rogues gallery link on the main menu, the picture images of every member that has uploaded a picture file can be viewed. This is an easy way to identify who can respond during an activation requiring such credentials.
Below the main menu is a search entry box that can be used to quickly locate any member quickly and easily. The member's call sign, last name, first name, county, city, or ZIP may be entered as search criteria. The query will return any and all members within the section that meets the search criteria entered.
The Where am I? table is available off of the link on the main menu. This is the look-up table the system used to determine a member's district (and therefore, their DEC) from their city/town. It also lists the home repeater, county, and Emergency Management Agency Region for each city/town.
The Availability/Assignment table is available off of the link on the main menu. This provides a list of records that have been entered using the Add link at the top of the form. The list can get pretty full over time, so the display can be limited to more recent records using the record number displayed at the top. This will limit the list to records greater than the selected number.
The Activity Log link on the main menu is used to determine the activity as far as account edits and updates are concerned. The idea is to show who updated their information, and when, so that any contact information can then be updated.
The User Log link on the main menu is used to show a full system activity report. All functions accessed are logged for security reasons, including the call sign of the user that was accessing that function. The report can also be used for debugging purposes, so any time you are reporting a problem, please include the date and time, and what you were doing when the issue occurred. This log can then be used by system admin to trace the issue in greater detail.

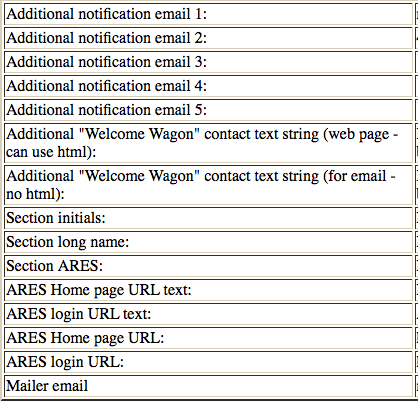
The Show Global database values link on the main menu is used to display items stored in the database that effect the display and certain functions in the project. The first 5 entries are email addresses who will get a message whenever any new signup is processed. The remaining settings affect the display and certain links throughout the project web interface. The super admin user is able to edit these values.
The email address in globals is used by the mailer default logic when emailing a district.